Sunday, December 29, 2013

Cross Stitch Mania!!

So I finished the Family Cross Stitch portrait I started yesterday (proof that this is one of the easiest projects you can do that your family will LOVE!!).  Here it is!!

I plan on framing it and hanging it somewhere in the house.


And, since my stitching fingers are on FIRE today, I wanted to create another pattern with Minions from Despicable Me.  I fell in love with something I found on Pinterest (see the end of this post) and created a Banana Song Minion Cross Stitch pattern.

You're welcome!

(also, for some reason in the pdf the tongue of the minion on the right is grey, but in all my files it looks pink... I can't give you an explanation for that, but just note that the tongue should be pink!)

And here is the original Pinterest post that inspired this pattern:

Friday, December 27, 2013

Cross-Stitch Family Portrait

So even though I'm not even cleaned up completely from my one year old's b-day party crafty stuff, nor have I even started putting away things from Christmas crafts, I'm starting another project!!

A few years ago, I made a cross-stitch of my husband's family.  This year, with the addition of our little guy, I decided to make one for our home.

Using Martha Stewart's templates as a jumping off point, I created my own pattern in Excel simply by setting equal width/height for the cells and filling the cells with the appropriate background color.  Then I added text using a pattern I created with the cross-stitch writing tool from stitchpoint.com.  I chose the Dublin font for this project.

Here is my finished pattern (the grey lines are there to mark the center and won't be in the finished product):


So tomorrow I'll be taking inventory of my random stash of sewing supplies and will probably make a visit to the craft store to get my fabric and whatever floss I need.


Tuesday, December 10, 2013

Deck the Halls With Boughs of... Skulls??

Here are the Kingsessing Morris Men posing with the reindeer scarf/wall hanging/whatever!  

Awesome reversible crocheted blanket!

Today I spent a cozy snow day finishing up a baby blanket for a friend who is going to have a baby soon.

I have a confession: I get tired of staring at the usual crocheted baby blankets.  They just look OLD to me!  Well, I found this idea of a reversible blanket that has fleece on the side.  With the right print, I knew I could update my favorite blanket pattern!

Here's the end result!


The how-to:

I used this pattern from Lion brand as a starting off point.  After finishing that, I picked out a fun fleece fabric, measured to the beginning of the first border round, cut to size, then hand stitched it to the blanket.  I then pinned the fleece to the fabric in alternating spots with straight pins and threaded my blue yarn through a tapestry needle.  Starting on one side of each straight pin, I put my needle through the fleece and crocheted side, then back through the crochet side and fleece on the other side of the pin.  I removed the pin and tied the two yarn ends in a knot.  I cut them to an inch in length.

Now I have a modern keepsake that is just so cuddly warm.  Unfortunately, it's not quite big enough for an adult to cuddle under - I tried!


Monday, December 9, 2013

Salt dough Handprint Keepsake

I can't find where this craft originated, but I saw this project floating around facebook and I thought I'd give it a whirl and make it festive for the holidays.  Here's the original project:

Directions:
1/2 c salt
1/2 c flour
1/4 c water ( give or take )
mix together, roll, press adults hand in first, then childs hand
bake @ 100 degrees for 3 hours

Paint desired colors.


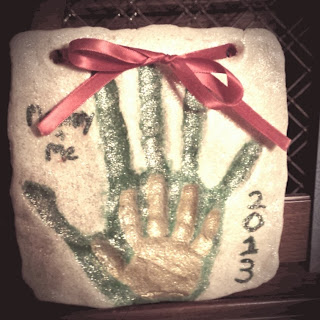
My final product:


A few notes:  
  • I don't know if the original creator of this project had mini hands, but one batch of this dough is not nearly enough for what they did!  I could barely fit my hand on here AND the holes for the ribbon!  So DOUBLE THE BATCH if you'd like to get anything more on here than what I did.
  • Toddlers just don't hold still for these sorts of projects.  So there's really no way it's gonna be perfect.  Just no way.
  • Leave lots of room for the holes.  I don't know if I'm going to test 'em by hanging this.  But if your plan is to hang make sure you use a wide ribbon (less chance of cutting through) and a thick amount of dough between the hole and the edge.
  • Cooking time may vary - I followed the directions exactly and the bottom side was nowhere near done!  I put the temperature of my oven up to 250 and baked it for maybe 2 hours more (I kept on checking every 30 minutes).
  • Glitter cures a multitude of ills.  I'm not sure I like my hand being green, but some nice gold glitter paint sorta toned it down!
  • I used the cheap Folk Art brand acrylic paints.  They worked just fine for this project.  


Wednesday, December 4, 2013

A Very Macabre Christmas FREE PATTERN!

This is it, folks!  The moment you've all been waiting for!  Your very own FREE crochet pattern for my (rein)deer skulls I mentioned in my last post!  Woooohoo!

And in case you'd rather not download it.... Here it is!  Have fun!


(Rein)deer Skulls


Materials:
White yarn (I used Sugar ‘n Creme)
Size H hook (or whatever needed for yarn)
Gauge: not necessary for this project

Stitch Explanation:

Magic Circle: Wrap yarn around your middle finger, forming an “X.”  Place your thumb over the “X.”  Slide loop off the end of your middle finger, still pinching the “X” between your thumb and middle finger.  Insert hook through the circle.  Pull up a loop.  Yarn over and draw through the loop on your hook (counts as chain for first sc)

sc2tog = single crochet 2 together:  Insert hook into stitch and draw up a loop. Insert hook into next stitch and draw up a loop. Yarn over, draw through all 3 loops on hook.

dc2tog = double crochet 2 together:  Yarn over (YO) hook, insert hook in stitch(st) , pull up a loop, 3 loops on hook.  YO hook, pull through 2 loops.  YO hook insert in next st, pull up a loop, 4 loops on hook.  YO, pull through 2 loops, 3 loops on hook.  YO pull through last 3 loops.  One dc2tog made.

dtr = double triple crochet:  Yarn over hook three times, then insert hook into next stitch.  Yarn over hook and draw yarn through stitch - five loops on the hook.  Loop yarn over hook and draw through two loops, (there are now four loops remaining on the hook), *yarn over hook and draw through two loops**, repeat * to ** twice more. 

Top of Head:
Make a magic circle using instructions above
Row 1: (you DO NOT need to ch 1 if you use instructions above for magic circle)  8 sc in magic circle. Join in first sc.  Pull tight.  
Row 2: Ch 1, do not turn.  2 sc in same sc as joining and in each sc.  Join in first sc (16 sc).
Row 3:  Ch 1, do not turn.  1 sc in same st as joining, *2 sc in next st.  1 sc in next.*  repeat from * to last sc.  2 sc in last st and join in first sc.  (24 sc)
Row 4:  Ch 1, do not turn.  1 sc in same st as joining. Sc in next st.  *2 sc in next st.  1 sc in next two sts.  Repeat from * to last sc.  2 sc in last st and join in first sc.  (32 sc)
Row 5:  Ch 1, do not turn.  1 sc in same st as joining.  1 sc in next two sts.  *2 sc in next st.  1 sc in next 3 sts.  Repeat from * to last sc.  2 sc in last st and join in first sc. (40 sc)
Row 6:  Ch 1, turn.  Sc in same sc as joining.  Chain 4, skip 4 sc, sc in the next (eye socket formed).  2 sc in the next. Sc in next 4 sts.  2 sc in the next.  Sc in next 4 sts.  2 sc in the next.  1 sc in the next.  Chain 4, skip 4 sc, sc in the next (eye socket formed).  

Row 7:  Ch 1, turn.  Sc in first sc.  4 sc in ch-4 space.  Sc in next 2 sts.  (2 sc in next st. Sc in next 5 sts) Twice. 2sc in next st.  Sc in next st.  4 sc in ch-4 space.  Sc in last st.  Fasten off.

Snout:  
Turn head upside down.  Counting from first sc of eye socket on right, join in 4th st.  
Row 1:  Ch 2.  YO, stick needle in next st.  Draw up loop.  Draw hook through 2 loops, then draw through last 2 loops (counts as dc2tog).  Hdc in next 2 sts.  Sc in next 3 sts.  Hdc in next 2 sts.  dc2tog.  (9 sts).    
Row 2:  Ch 1, turn.  sc2tog.  Sc in next 5 sts.  sc2tog (7 sts)
Row 3:  Ch 1, turn.  Sc across (7 sc)
Row 4: Ch 1, turn.  sc2tog.  Sc in next 3 sts.  sc2tog (5 sts)
Row 5:  Ch 1, turn.  Sc across (5 sc)
Row 6: Ch 6, turn (counts as first dtr and ch-1 space).  Skip 1 st.  Dtr in next.  Ch 1.  Skip 1 st.  Dtr in next (3 dtr, 2 ch-1 spaces).  Fasten off.  

Right Antler:
Turn right side up.  With right side facing you, start with first sc of right eye.  Join to 9th sc.
Row 1:  Ch 1.  Do not turn.  Sc in same ch as joining and in next 3 sts.  (4 sc)
Row 2:  Ch 1, turn.  sc2tog.  Sc in next st.  2 sc in next st.  (4 sts)
Row 3:  Ch 1, turn.  2 sc in first st.  Sc in next st.  sc2tog last 2 sts.  (4 sts).
Row 4:  Ch 6, turn.  sc in 2nd ch from hook and in next 4 chs.  sc2tog.  Sc in next st.  2 sc in last st.  (9 sts)
Row 5: Repeat Row 3 (4 sts)
Row 6:  Repeat Row 2 (4 sts)  
Row 7:  Repeat Row 3 (4 sts)
Row 8:  Ch 4, turn.  Sc in 2nd ch from hook and in next 2 sts.  sc2tog.  Sc in next st.  2 sc in last st (7 sts)
Row 9:  Ch 4, turn.  Sc in 2nd ch from hook and in next 2 sts.  2 sc in next st.  Sc in next st.  Slip st in next st.  (6 scs) Fasten off.

Left Antler: 
WRONG side facing you and counting from last sc of first row of Right Antler, join to 9th st. 


Rows 1-9:  Repeat instructions for Right Antler.  Fasten off.  Weave in ends or leave tail on snout for sewing if making a scarf.


To make scarf:  Run tail from snout through tapestry needle.  Sew to top of head of another deer going through each of the 5 stitches on each deer.  (note: the antlers are loose so they will not stay straight if you make it into a scarf)

A Very Macabre Christmas

Drawing inspiration from my crocheted skulls, and from a Morris dancing friend, I made these yesterday:


0_o

Let the dead Rudolph jokes fly!  But seriously, my timing couldn't be more perfect.  Remember this?


You're welcome.

Pattern to follow!

EDIT:  Pattern is now available on my latest post!

Tuesday, December 3, 2013

Skull Scarf

My nephew loves skulls.  And he loves bow ties, thanks to Uncle B!  So, after buying this little gem for him for Christmas...

The Jolly Roger tie from Beau Ties Ltd.

...I thought I'd make something for him as well.  Because.

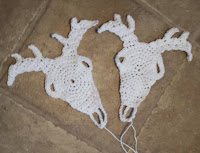
I searched the interwebs for a free skull pattern.   I really liked what I found on this blog.  Using her pictures and descriptions as a starting point, I was able to come up with my own version.  Here's a picture of the one I made...


...or three (scarf, anyone?)...


...AND I wrote it out in crochety terms for all you folks who might be interested!

Here it is!  (you can also get the pdf here if you're so inclined.  FREE!!)

Skull Pattern

Materials:
White yarn (I used Sugar ‘n Cream cotton yarn)
Size H hook (or hook required for yarn)

Gauge is not necessary, but using the H hook my skulls were each about 4”x5”.

Chain 14.  Join to form ring.
Chain 14.  Join at same chain as first joining to form figure 8. Chain 1.  Do not turn.
TOP
Row 1:  Working in the loops in one continuous circle, 18 sc evenly spaced in first loop and continue on to 2nd loop and make 18 sc evenly spaced in second loop for a total of 36 sc.  Join with slip stitch in first sc.  Fasten off.
Row 2:  Right side facing you, count from center to the right and join in 7th sc from center. Chain 1, sc in same chain as joining and in next 13 stitches (14 sc).  Chain 1, turn.
Row 3: sc2together, sc in next 10 stitches until last 2 sc, sc2together.  (12 sc) Chain 1, turn
Row 4: sc across (12 sc).  Chain 1, turn.
Row 5: sc2together, sc in next 8 stitches until last 2 sc, sc2together (10 sc).  Chain 1, turn.
Row 6: sc across (10 sc).  Chain 1, turn.
Row 7: sc2together, sc in next 6 stitches until last 2 sc, sc2together (8 sc).  Chain 1, turn.
Row 8: sc across (8 sc).  Fasten off.
BOTTOM
Turn skull upside down.  Right side facing you, count 6 stitches to the right from the center and join.  Chain 1.
Row 1: sc in same chain as joining and in next 3c stitches.  Chain 3.  Skip 4 stitches.  sc in next 4 stitches.  (8 sc, 1 ch space).  Chain 1, turn.
Row 2: sc in next 4 stitches, 3 sc in ch space, sc in next 4 stitches (11 sc). Chain 1, turn.
Row 3:  Slip stitch in first 3 stitches.  Chain 1, sc in same stitch as last slip stitch.  *Chain 3.  Skip 1 sc.  Sc in the next.* 3 times.  (three chain spaces).  Chain 1, turn.
Row 4:  slip st. in first sc, sc in each chain space (3 sc).  Fasten off leaving a long tail for sewing.  Weave in all other ends.

Sunday, November 10, 2013

Crocheted Farm Playmat

For my sis-in-law's baby shower I made this cute farm playmat (FREE pattern from Lionbrand).  I followed the pattern to a T and it came out a bit longer than I wanted it to, but I'm still very happy with it.  My favorite part is the field with the carrots you can "plant"!


Wednesday, November 6, 2013

Crochet Minnie Mouse Hat

This ain't the best photo, but I made this cute hat for a friend who is going on a Disney cruise next month.  The buttons go all the way around and are on both sides of the bow.  Original pattern by Repeat Crafter Me.  I used her modifications for 6-9 month sizing.

Saturday, November 2, 2013

Minion Birthday Part 3!

We just got back from H's first birthday party bash and we had a wonderful time!  If you need a reminder of what I've been working on, visit Part 1 and Part 2 of this Minion Birthday Party Series.

Here are some pictures of the final decorations!

My version of Miss Hattie's cookies!  I served them in a dog bowl (remember this scene?) and used the labels I mention in my last post (dang, I forgot to get color copies after all that work!  Ha!).

The birthday boy loves his balloons!

Minion bowling - I saved toilet paper rolls and painted them with acrylic art paint (the cheap stuff that's like 75 cents a bottle).  I used yellow and blue for the body; white, grey, and black for the eyes and goggles.  I got the ball at a local dollar store.

More into eating the minions than actually bowling...

The bunting I created!  Get a blank template as a pdf ,
add your own letters, print, and cut out!

Minion cupcakes made by Stacie's Sweet Tooth Cakes!
She cut a twinkie in half for the heads and piped on the faces.

I gave each kid their own goodie bag with a ball shooter from the dollar store.  I wrote "Piranha Gun" on the sides with a Sharpie and drew little piranha faces on all the balls.  The kids went CRAZY over them, and the good news is these don't shoot very far so us adults didn't have to worry :)

The girls got these tutus from Amazon and the boys got minion goggles I found at a dollar store (here are similar ones on Amazon),  but the kids were more interested in the guns, ha!

I also decided to put stickers and markers on a table so the kids could decorate their goodie bags.  All the stickers were from the dollar store.  They LOVED it!  

Saturday, October 12, 2013

Minion Birthday Part 2!

I am well into the throes of planning H's first birthday party, so here is what I have been doing!

We're gonna have dog bowls filled with the cookies the girls are sellin' in the first movie (Caramel Clumpies, Minty Mints, Choco Swirlies, Coconutties, Toffee Totes).  I've decided to hit our local grocery store for brand name cookies that are similar.


Despicable Me name       Brand name*
Caramel Clumpies           Chips Ahoy! Sweet 'n Salty Salted Caramel Chunks
Minty Mints                     GIANT foodstores brand Fudge Mint Cookies**
Choco Swirlies                Keebler Fudge Stripes Dark Chocolate
Coconutties                      GIANT foodstores brand Caramel Coconut Fudge Cookies**
Toffee Totes***              Keebler Sandies Toffee

*I have not been paid by any of these companies, I'm just posting these so you don't have to spend as much time scouring the shelves as I did.  Cheers!
**I went the inexpensive route with these, but there are some name brands that make the same sort of thing.
***Technically, they're supposed to be covered in chocolate, but I couldn't find any other cookie in stores that included toffee.  If you find something, let me know!

If you are inclined to bake, this lovely blog shares the recipes from the DVD extras menu and also provided the inspiration for my own cookie labels.

Just cut and fold in half!

And what about Father/Son Minion hats? Oh yeeeah!


Finally, I found small reusable bags in blue and yellow at the dollar store to use as favor bags (for the kids only).  I'll fill them with tutus for the girls (check out these for less than $1 each on Amazon!), Gru scarves for the boys (I crocheted them myself, just sc alternating black and grey yarn until it was as wide and long as I wanted), and blaster guns with balls for everyone.  We'll use these suckers to play the "shoot the spaceship" carnival game from the movie.  I got the idea from here!

So here is my Dollar Store list so far:
  • Blaster guns
  • Small "canvas" bags
  • Blue dog bowls
  • Medium sized ball for "minion bowling" (stay tuned for a how-to!)
  • Yellow table cloths
  • Blue and yellow crepe paper (2/$1!!)
I did briefly consider getting fluffy unicorns as prizes for the kids, but I'll probably skip this to save a bit of cash.  However, I found this great deal on bulk plush unicorns that would do the job on the Birthday Express website!


Monday, September 9, 2013

Minion Birthday Part 1!

We're planning our son's first birthday and I will post templates as I come up with them.  Feel free to save these images by right clicking on 'em.

Our theme is Despicable Me, which means MINIONS!!!

What's a party without bunting?  Here's a template I will print out for each letter in "Happy 1st Birthday".  Free printable!


Stay tuned for more minion fun!!

Thursday, May 9, 2013

S'mores thank you gift

We recently had a friend in the hospital and we decided to send the nursing staff at his doc's office and the rehab center a thank you gift for their tremendous care! 

 I decided to make these S'mores Chocolate Chip Cookies.  My apologies for not having a picture of the ones I baked, but they turned out looking just like this pic!  I ended up just putting marshmallows into my usual chocolate chip cookie batter and followed their assembly instructions.

We had some leftover bakery containers from the grocery store, so I just washed 'em and packed the cookies with parchment paper separating the layers.

After searching the interwebs for a label idea, I decided to make my own.  I found this Vintage One font (doesn't it sort of remind you of Napoleon Dynamite?) and got the quote from Pinterest.  I printed it out and taped one to each of the bakery boxes.  Easy peasy!


Feel free to use it!  Right click to Save and edit to your heart's content!

The packages were a big hit with the staff!

Happy crafting!

Tuesday, April 16, 2013

Fort Kit

My nephew's birthday is in just a couple of weeks and I wanted to get him something special.  He has a million toys, so I decided to search on Pinterest.   When I babysit we always make a fort out of whatever blankets and pillows are laying around, so I was so excited to find the idea of making a fort kit for kids.  PERFECT!!

I gathered all the supplies and the whole thing cost me a whopping $15!!  Yay!!

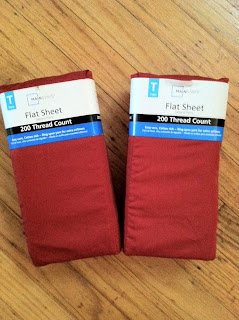
  • 2 flat sheets (twin) - $10 total
  • Glowing things (sword and bracelets) - $2 total
  • Men's t-shirt to make loops and ties for the sheets - $3 (I love the sale rack!!)
  • Zippered plastic bag (left over from a baby gift, could also be one of those reusable grocery bags, or you could make your own drawstring bag.  I chose to use whatever was laying around).
  • Card stock (whatever I had)
  • Stencils from the decorate-a-onesie craft at my baby shower
  • Marker (I used a blue fine point Sharpie)
And here are some pictures...

Glowing things!

Sheets!

 Bag!

Label!

To make the label, I used regular 12x12 card stock that I had hanging around and cut it to the size of my bag (see previous picture).  I used blue and green (they're a lot brighter than in this pic, sorry about that!), then used stencils and a blue fine-point Sharpie to personalize it.  


Shirt!

This one was labeled a men's Small, but it seemed a bit large to me... 

To make the strips for the ties and loops, cut the collar and sleeves off (and a little more) until you have a rectangle (I use the "no measure" method, hence the rough edges):

Rectangle!

Cut the rectangle longwise into at least 14 "equal" strips about 24" long (depends on the size of the shirt) (my strips are about 1/2" to 1" wide, and I only had to use one side of the t-shirt)

Strips!

This fort tutorial shows another way to cut the strips and has a great diagram showing where to sew on the strips.  My sewing machine is buried, so I will post a picture of the finished project soon!!


Tuesday, April 9, 2013

Celtic Baptism Theme Part II

So I will probably change my original plan to use Hershey's Kisses as a favor since our baptism luncheon will be outside - in June!  NOT a good plan!

I found this really cute idea to make celtic knot cookies using a shortbread recipe.

Pictures WILL be posted, I promise!!

Sunday, April 7, 2013

Celtic Baptism Theme

Our boy is being baptized in a few months and I have been playing around with ideas for a theme.  I finally concluded that I wanted to stick with a Trinity theme rather than the standard cross theme.  Tapping into our Celtic roots, I came up with the idea of using a celtic trinity knot as the main decoration.  So I came up with a cheap favor idea: Hershey's kisses with customized labels!

My plan is to print these circles on sticky paper, cut them out, and stick on the kisses.  I'll then put a couple in organza bags from the dollar store with a little "thank you" card attached.

Here are my labels (I didn't make them perfectly, but it doesn't matter because I'll be cutting around the edge of the circle):


A brief how-to:
  • Download the 3/4" round label template found on the Avery website.  Open in your word processor.
  • Download this trinity knot image.  
  • Using a photo editor, change the background color to match your theme.  I used this online photo editor.
  • Purchase Avery Sticker Project Paper (8.5" x 11").  Print your circles on the paper.
  • Cut out the circles.  Remove protective backing and stick onto Hershey's Kisses.
  • Put a couple of kisses in organza bags.
  • Customize and print out business cards using Avery business card template.
  • Create hole using hole punch and attach to organza bag using choice of ribbon.
I also plan to have trinity knot fondant pieces on cupcakes for our guests.  Stay tuned for pictures after the special day!

Monday, March 25, 2013

Little Treasures

So this isn't a craft per se, but I have a fascination with Montessori type activities for kids.  I would love to see my little boy grow up with an active imagination.  I don't want to see him walking around with a screen in front of himself all the time!

Since H is still little, I decided to start with a simple treasure basket.  Here's where I found the original idea for H's basket.

Using stuff around the home, I found a baby brush (mine is plastic, as opposed to a natural material as Montessori teachers would recommend) and a red kerchief.  The idea is to find objects that will engage all the senses.  As he gets older and is able to handle more without my assistance, I'll add more items and group them in categories like specific shapes, materials, textures, etc., or items that teach a different skill like twisting or transferring.  For now, we're keeping it simple!


Here is H exploring his basket:


Yum!


This kept him entertained for about 15 minutes, and then it was nap time.  I call that a success!