Sunday, December 29, 2013

Cross Stitch Mania!!

So I finished the Family Cross Stitch portrait I started yesterday (proof that this is one of the easiest projects you can do that your family will LOVE!!).  Here it is!!

I plan on framing it and hanging it somewhere in the house.


And, since my stitching fingers are on FIRE today, I wanted to create another pattern with Minions from Despicable Me.  I fell in love with something I found on Pinterest (see the end of this post) and created a Banana Song Minion Cross Stitch pattern.

You're welcome!

(also, for some reason in the pdf the tongue of the minion on the right is grey, but in all my files it looks pink... I can't give you an explanation for that, but just note that the tongue should be pink!)

And here is the original Pinterest post that inspired this pattern:

Friday, December 27, 2013

Cross-Stitch Family Portrait

So even though I'm not even cleaned up completely from my one year old's b-day party crafty stuff, nor have I even started putting away things from Christmas crafts, I'm starting another project!!

A few years ago, I made a cross-stitch of my husband's family.  This year, with the addition of our little guy, I decided to make one for our home.

Using Martha Stewart's templates as a jumping off point, I created my own pattern in Excel simply by setting equal width/height for the cells and filling the cells with the appropriate background color.  Then I added text using a pattern I created with the cross-stitch writing tool from stitchpoint.com.  I chose the Dublin font for this project.

Here is my finished pattern (the grey lines are there to mark the center and won't be in the finished product):


So tomorrow I'll be taking inventory of my random stash of sewing supplies and will probably make a visit to the craft store to get my fabric and whatever floss I need.


Tuesday, December 10, 2013

Deck the Halls With Boughs of... Skulls??

Here are the Kingsessing Morris Men posing with the reindeer scarf/wall hanging/whatever!  

Awesome reversible crocheted blanket!

Today I spent a cozy snow day finishing up a baby blanket for a friend who is going to have a baby soon.

I have a confession: I get tired of staring at the usual crocheted baby blankets.  They just look OLD to me!  Well, I found this idea of a reversible blanket that has fleece on the side.  With the right print, I knew I could update my favorite blanket pattern!

Here's the end result!


The how-to:

I used this pattern from Lion brand as a starting off point.  After finishing that, I picked out a fun fleece fabric, measured to the beginning of the first border round, cut to size, then hand stitched it to the blanket.  I then pinned the fleece to the fabric in alternating spots with straight pins and threaded my blue yarn through a tapestry needle.  Starting on one side of each straight pin, I put my needle through the fleece and crocheted side, then back through the crochet side and fleece on the other side of the pin.  I removed the pin and tied the two yarn ends in a knot.  I cut them to an inch in length.

Now I have a modern keepsake that is just so cuddly warm.  Unfortunately, it's not quite big enough for an adult to cuddle under - I tried!


Monday, December 9, 2013

Salt dough Handprint Keepsake

I can't find where this craft originated, but I saw this project floating around facebook and I thought I'd give it a whirl and make it festive for the holidays.  Here's the original project:

Directions:
1/2 c salt
1/2 c flour
1/4 c water ( give or take )
mix together, roll, press adults hand in first, then childs hand
bake @ 100 degrees for 3 hours

Paint desired colors.


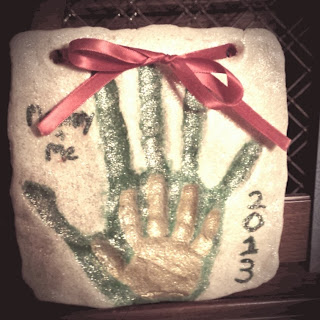
My final product:


A few notes:  
  • I don't know if the original creator of this project had mini hands, but one batch of this dough is not nearly enough for what they did!  I could barely fit my hand on here AND the holes for the ribbon!  So DOUBLE THE BATCH if you'd like to get anything more on here than what I did.
  • Toddlers just don't hold still for these sorts of projects.  So there's really no way it's gonna be perfect.  Just no way.
  • Leave lots of room for the holes.  I don't know if I'm going to test 'em by hanging this.  But if your plan is to hang make sure you use a wide ribbon (less chance of cutting through) and a thick amount of dough between the hole and the edge.
  • Cooking time may vary - I followed the directions exactly and the bottom side was nowhere near done!  I put the temperature of my oven up to 250 and baked it for maybe 2 hours more (I kept on checking every 30 minutes).
  • Glitter cures a multitude of ills.  I'm not sure I like my hand being green, but some nice gold glitter paint sorta toned it down!
  • I used the cheap Folk Art brand acrylic paints.  They worked just fine for this project.  


Wednesday, December 4, 2013

A Very Macabre Christmas FREE PATTERN!

This is it, folks!  The moment you've all been waiting for!  Your very own FREE crochet pattern for my (rein)deer skulls I mentioned in my last post!  Woooohoo!

And in case you'd rather not download it.... Here it is!  Have fun!


(Rein)deer Skulls


Materials:
White yarn (I used Sugar ‘n Creme)
Size H hook (or whatever needed for yarn)
Gauge: not necessary for this project

Stitch Explanation:

Magic Circle: Wrap yarn around your middle finger, forming an “X.”  Place your thumb over the “X.”  Slide loop off the end of your middle finger, still pinching the “X” between your thumb and middle finger.  Insert hook through the circle.  Pull up a loop.  Yarn over and draw through the loop on your hook (counts as chain for first sc)

sc2tog = single crochet 2 together:  Insert hook into stitch and draw up a loop. Insert hook into next stitch and draw up a loop. Yarn over, draw through all 3 loops on hook.

dc2tog = double crochet 2 together:  Yarn over (YO) hook, insert hook in stitch(st) , pull up a loop, 3 loops on hook.  YO hook, pull through 2 loops.  YO hook insert in next st, pull up a loop, 4 loops on hook.  YO, pull through 2 loops, 3 loops on hook.  YO pull through last 3 loops.  One dc2tog made.

dtr = double triple crochet:  Yarn over hook three times, then insert hook into next stitch.  Yarn over hook and draw yarn through stitch - five loops on the hook.  Loop yarn over hook and draw through two loops, (there are now four loops remaining on the hook), *yarn over hook and draw through two loops**, repeat * to ** twice more. 

Top of Head:
Make a magic circle using instructions above
Row 1: (you DO NOT need to ch 1 if you use instructions above for magic circle)  8 sc in magic circle. Join in first sc.  Pull tight.  
Row 2: Ch 1, do not turn.  2 sc in same sc as joining and in each sc.  Join in first sc (16 sc).
Row 3:  Ch 1, do not turn.  1 sc in same st as joining, *2 sc in next st.  1 sc in next.*  repeat from * to last sc.  2 sc in last st and join in first sc.  (24 sc)
Row 4:  Ch 1, do not turn.  1 sc in same st as joining. Sc in next st.  *2 sc in next st.  1 sc in next two sts.  Repeat from * to last sc.  2 sc in last st and join in first sc.  (32 sc)
Row 5:  Ch 1, do not turn.  1 sc in same st as joining.  1 sc in next two sts.  *2 sc in next st.  1 sc in next 3 sts.  Repeat from * to last sc.  2 sc in last st and join in first sc. (40 sc)
Row 6:  Ch 1, turn.  Sc in same sc as joining.  Chain 4, skip 4 sc, sc in the next (eye socket formed).  2 sc in the next. Sc in next 4 sts.  2 sc in the next.  Sc in next 4 sts.  2 sc in the next.  1 sc in the next.  Chain 4, skip 4 sc, sc in the next (eye socket formed).  

Row 7:  Ch 1, turn.  Sc in first sc.  4 sc in ch-4 space.  Sc in next 2 sts.  (2 sc in next st. Sc in next 5 sts) Twice. 2sc in next st.  Sc in next st.  4 sc in ch-4 space.  Sc in last st.  Fasten off.

Snout:  
Turn head upside down.  Counting from first sc of eye socket on right, join in 4th st.  
Row 1:  Ch 2.  YO, stick needle in next st.  Draw up loop.  Draw hook through 2 loops, then draw through last 2 loops (counts as dc2tog).  Hdc in next 2 sts.  Sc in next 3 sts.  Hdc in next 2 sts.  dc2tog.  (9 sts).    
Row 2:  Ch 1, turn.  sc2tog.  Sc in next 5 sts.  sc2tog (7 sts)
Row 3:  Ch 1, turn.  Sc across (7 sc)
Row 4: Ch 1, turn.  sc2tog.  Sc in next 3 sts.  sc2tog (5 sts)
Row 5:  Ch 1, turn.  Sc across (5 sc)
Row 6: Ch 6, turn (counts as first dtr and ch-1 space).  Skip 1 st.  Dtr in next.  Ch 1.  Skip 1 st.  Dtr in next (3 dtr, 2 ch-1 spaces).  Fasten off.  

Right Antler:
Turn right side up.  With right side facing you, start with first sc of right eye.  Join to 9th sc.
Row 1:  Ch 1.  Do not turn.  Sc in same ch as joining and in next 3 sts.  (4 sc)
Row 2:  Ch 1, turn.  sc2tog.  Sc in next st.  2 sc in next st.  (4 sts)
Row 3:  Ch 1, turn.  2 sc in first st.  Sc in next st.  sc2tog last 2 sts.  (4 sts).
Row 4:  Ch 6, turn.  sc in 2nd ch from hook and in next 4 chs.  sc2tog.  Sc in next st.  2 sc in last st.  (9 sts)
Row 5: Repeat Row 3 (4 sts)
Row 6:  Repeat Row 2 (4 sts)  
Row 7:  Repeat Row 3 (4 sts)
Row 8:  Ch 4, turn.  Sc in 2nd ch from hook and in next 2 sts.  sc2tog.  Sc in next st.  2 sc in last st (7 sts)
Row 9:  Ch 4, turn.  Sc in 2nd ch from hook and in next 2 sts.  2 sc in next st.  Sc in next st.  Slip st in next st.  (6 scs) Fasten off.

Left Antler: 
WRONG side facing you and counting from last sc of first row of Right Antler, join to 9th st. 


Rows 1-9:  Repeat instructions for Right Antler.  Fasten off.  Weave in ends or leave tail on snout for sewing if making a scarf.


To make scarf:  Run tail from snout through tapestry needle.  Sew to top of head of another deer going through each of the 5 stitches on each deer.  (note: the antlers are loose so they will not stay straight if you make it into a scarf)

A Very Macabre Christmas

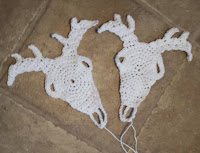
Drawing inspiration from my crocheted skulls, and from a Morris dancing friend, I made these yesterday:


0_o

Let the dead Rudolph jokes fly!  But seriously, my timing couldn't be more perfect.  Remember this?


You're welcome.

Pattern to follow!

EDIT:  Pattern is now available on my latest post!

Tuesday, December 3, 2013

Skull Scarf

My nephew loves skulls.  And he loves bow ties, thanks to Uncle B!  So, after buying this little gem for him for Christmas...

The Jolly Roger tie from Beau Ties Ltd.

...I thought I'd make something for him as well.  Because.

I searched the interwebs for a free skull pattern.   I really liked what I found on this blog.  Using her pictures and descriptions as a starting point, I was able to come up with my own version.  Here's a picture of the one I made...


...or three (scarf, anyone?)...


...AND I wrote it out in crochety terms for all you folks who might be interested!

Here it is!  (you can also get the pdf here if you're so inclined.  FREE!!)

Skull Pattern

Materials:
White yarn (I used Sugar ‘n Cream cotton yarn)
Size H hook (or hook required for yarn)

Gauge is not necessary, but using the H hook my skulls were each about 4”x5”.

Chain 14.  Join to form ring.
Chain 14.  Join at same chain as first joining to form figure 8. Chain 1.  Do not turn.
TOP
Row 1:  Working in the loops in one continuous circle, 18 sc evenly spaced in first loop and continue on to 2nd loop and make 18 sc evenly spaced in second loop for a total of 36 sc.  Join with slip stitch in first sc.  Fasten off.
Row 2:  Right side facing you, count from center to the right and join in 7th sc from center. Chain 1, sc in same chain as joining and in next 13 stitches (14 sc).  Chain 1, turn.
Row 3: sc2together, sc in next 10 stitches until last 2 sc, sc2together.  (12 sc) Chain 1, turn
Row 4: sc across (12 sc).  Chain 1, turn.
Row 5: sc2together, sc in next 8 stitches until last 2 sc, sc2together (10 sc).  Chain 1, turn.
Row 6: sc across (10 sc).  Chain 1, turn.
Row 7: sc2together, sc in next 6 stitches until last 2 sc, sc2together (8 sc).  Chain 1, turn.
Row 8: sc across (8 sc).  Fasten off.
BOTTOM
Turn skull upside down.  Right side facing you, count 6 stitches to the right from the center and join.  Chain 1.
Row 1: sc in same chain as joining and in next 3c stitches.  Chain 3.  Skip 4 stitches.  sc in next 4 stitches.  (8 sc, 1 ch space).  Chain 1, turn.
Row 2: sc in next 4 stitches, 3 sc in ch space, sc in next 4 stitches (11 sc). Chain 1, turn.
Row 3:  Slip stitch in first 3 stitches.  Chain 1, sc in same stitch as last slip stitch.  *Chain 3.  Skip 1 sc.  Sc in the next.* 3 times.  (three chain spaces).  Chain 1, turn.
Row 4:  slip st. in first sc, sc in each chain space (3 sc).  Fasten off leaving a long tail for sewing.  Weave in all other ends.